Service: Kopia (Backups)
Location: /mnt/pool01/homelab/services/ops-stack/kopia
Kopia is a fast, highly secure backup tool. In this stack, it is responsible for backing up the services folder containing all configs, databases, and compose files by taking daily, deduplicated, and encrypted snapshots and offloading them to Cloudflare R2 object storage.
Docker Compose
networks:
  dockerapps-net:
    external: true

services:
  kopia:
    image: kopia/kopia:latest
    container_name: kopia
    hostname: kopia
    networks:
      dockerapps-net:
        ipv4_address: 172.20.0.33
        ipv6_address: fd00:dead:beef:2::33
    ports:
    # Expose locally for setup, then close if we reverse proxy with Caddy
      - 51515:51515
    # Enable FUSE for mounting snapshots (Optional but recommended)
    cap_add:
      - SYS_ADMIN
    devices:
      - /dev/fuse:/dev/fuse
    environment:
      - TZ=${TZ}
      # This is the password to login to the Web UI
      - KOPIA_SERVER_USERNAME=${KOPIA_SERVER_USERNAME}
      - KOPIA_SERVER_PASSWORD=${KOPIA_SERVER_PASSWORD}
      # REPOSITORY ENCRYPTION KEY (CRITICAL)
      # This MUST match the encryption password we created in the UI setup step.
      # If this is missing, Kopia cannot start.
      - KOPIA_PASSWORD=${KOPIA_REPO_PASSWORD}
    volumes:
      # 1. Kopia State (Config & Cache)
      - ./config:/app/config
      - ./cache:/app/cache
      - ./data:/app/data:ro
      - ./logs:/app/logs
      # 2. SOURCE DATA (Mounting our Homelab Pool)
      # We mount it to /source so Kopia sees the whole structure
      - /mnt/pool01/homelab/services:/source/homelab/services
      # This is for when we want to restore to a particular folder first
      - /home/sfarhan/kopia-restores:/restore-target

    # Start Kopia in Server Mode
    command:
      - server
      - start
      - --insecure             # Allow HTTP (since we will use internal network -> Caddy later)
      - --address=0.0.0.0:51515
      - --override-hostname=kopia #Keeps host consistent in snapshots
      - --server-username=${KOPIA_SERVER_USERNAME}
      - --server-password=${KOPIA_SERVER_PASSWORD}
      - --disable-csrf-token-checks
    restart: unless-stopped
Architecture & Exclusions
- Source:
/mnt/pool01/homelab/services(Mounted Read-Only to ensure backup integrity). - Destination: Cloudflare R2 Bucket (S3-Compatible Object Storage).
- Encryption: AES-256 Client-side encryption (Data is encrypted locally before ever leaving the server).
The Exclusion Logic (.kopiaignore)
Because the ../homelab/services folder contains gigabytes of generated caches, temporary transcodes, and logs, we use a .kopiaignore file at the root of the pool (/mnt/pool01/homelab/services/.kopiaignore) to prevent backing up junk data.
Expand to view live .kopiaignore file
# HEAVYWEIGHTS (The 21GB+ Stuff)
# The Docker Engine Root (Images, Overlay2, Containers)
# verified this is ~21GB and can be rebuilt by Docker.
docker-data/

# Large Media Mounts (Just in case they are symlinked)
**/media/
**/movies/
**/tv/
**/downloads/
**/incomplete/
**/games/
**/library/

# JUNK & TEMPORARY FILES
# Global Cache & Logs
**/cache/
**/.cache/
**/logs/
**/log/
**/tmp/
**/*.log
**/*.tmp

# Specific log files not in folders
**/log.txt
**/logs.txt

# --- Specific Pattern Directories ---
# These catch our specific naming conventions
**/*-cache/
**/goaccess/data/**

# Ignore Sonarr/Radarr covers (They are just for Admin UI)
**/MediaCover/
**/mediacover/

# Jellyfin Specifics
**/jellyfin-config/config/cache/
**/jellyfin-config/config/log/
**/jellyfin-config/data/transcodes/
**/jellyfin-config/data/data/subtitles/
**/jellyfin-config/data/data/attachments/
**/jellyfin-config/data/metadata/

# CrowdSec (Downloaded Rules)
# We backup config.yaml/acquis.yaml, but ignore the auto-downloaded rules
**/crowdsec/config/hub/**
**/crowdsec/data/**

# Git (Already on GitHub, no need to backup history twice)
.git/
.gitignore

# OS Junk
.DS_Store
Thumbs.db
lost+found
.Trash-1000

# Ignore extracted subtitle caches
# Keep .srt (text) but ignore .sup/.sub (bitmaps)
*.sup
*.sub
*.idx
Deployment Guide
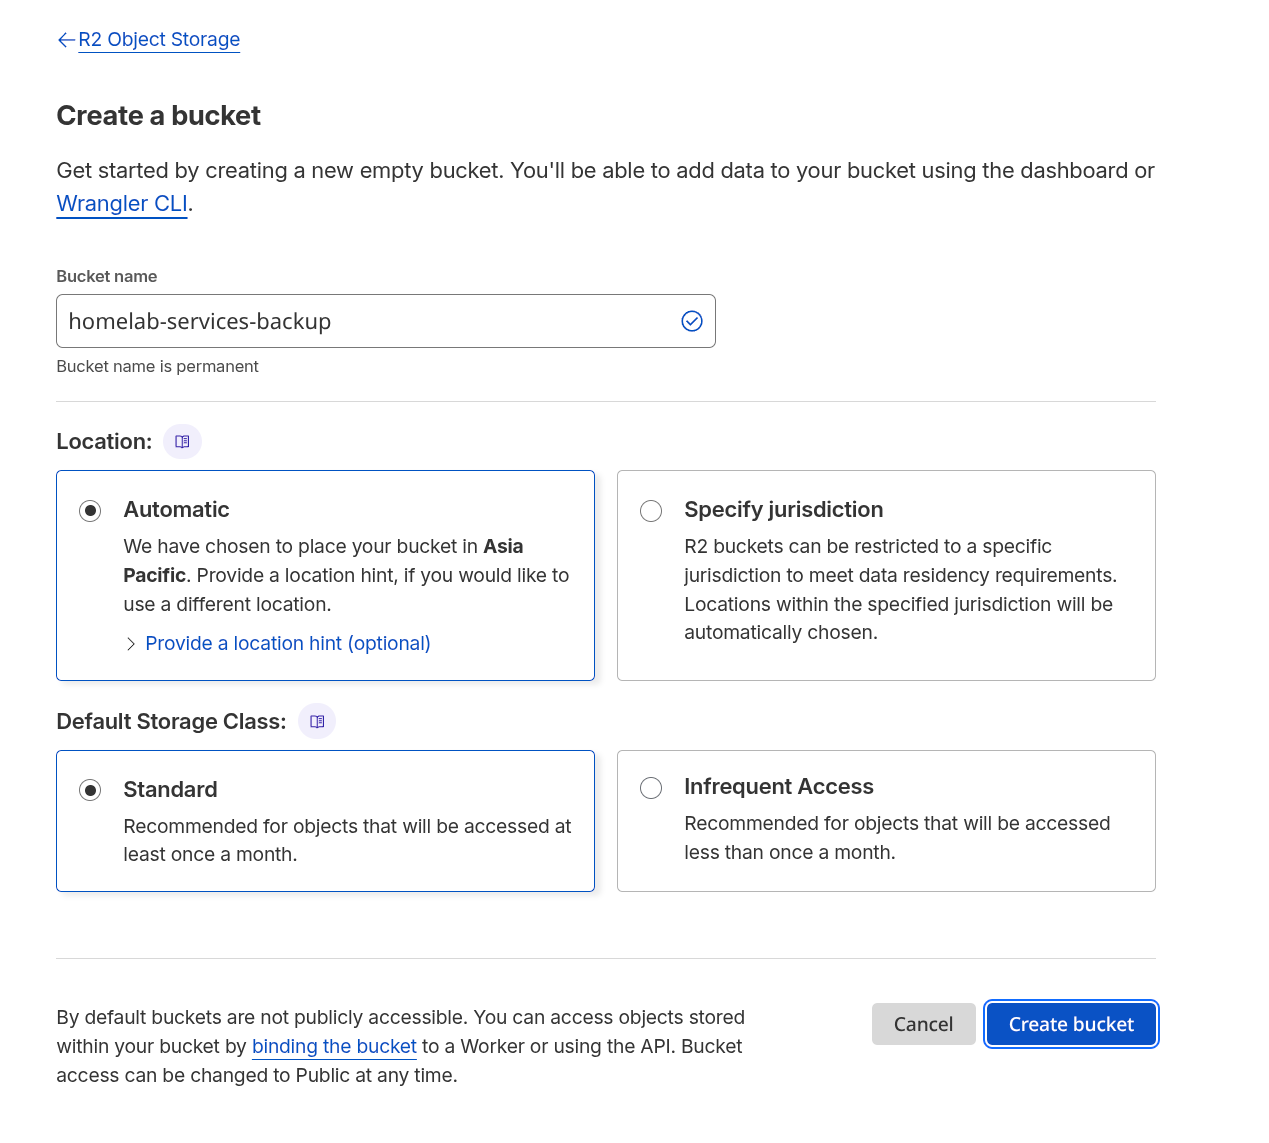
Cloudflare R2 Preparation
- Log in to our Cloudflare Dashboard and navigate to R2.
- Create Bucket: Name it.
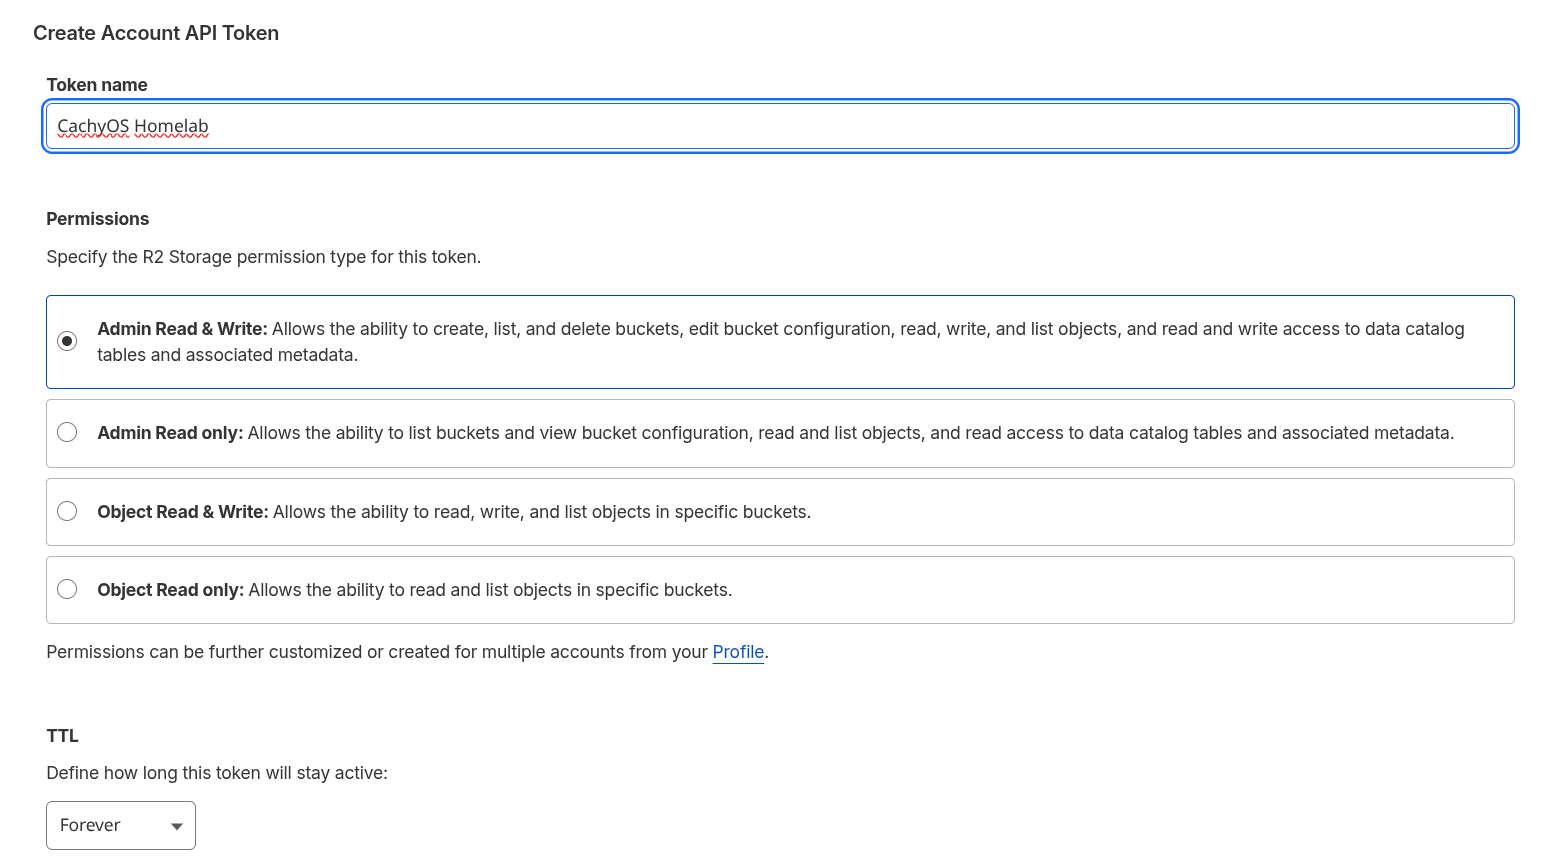
- Manage R2 API Tokens > Create API Token.
- Permissions:
Admin Read & Write. - TTL:
Forever.
- Permissions:
- Save the Access Key ID, Secret Access Key, and the S3 Endpoint URL.
Repository Initialization (First Run)
The container will start after docker compuse up, but it will not back anything up until connected to R2.
- Navigate to
http://172.20.0.33:51515 - Log in with
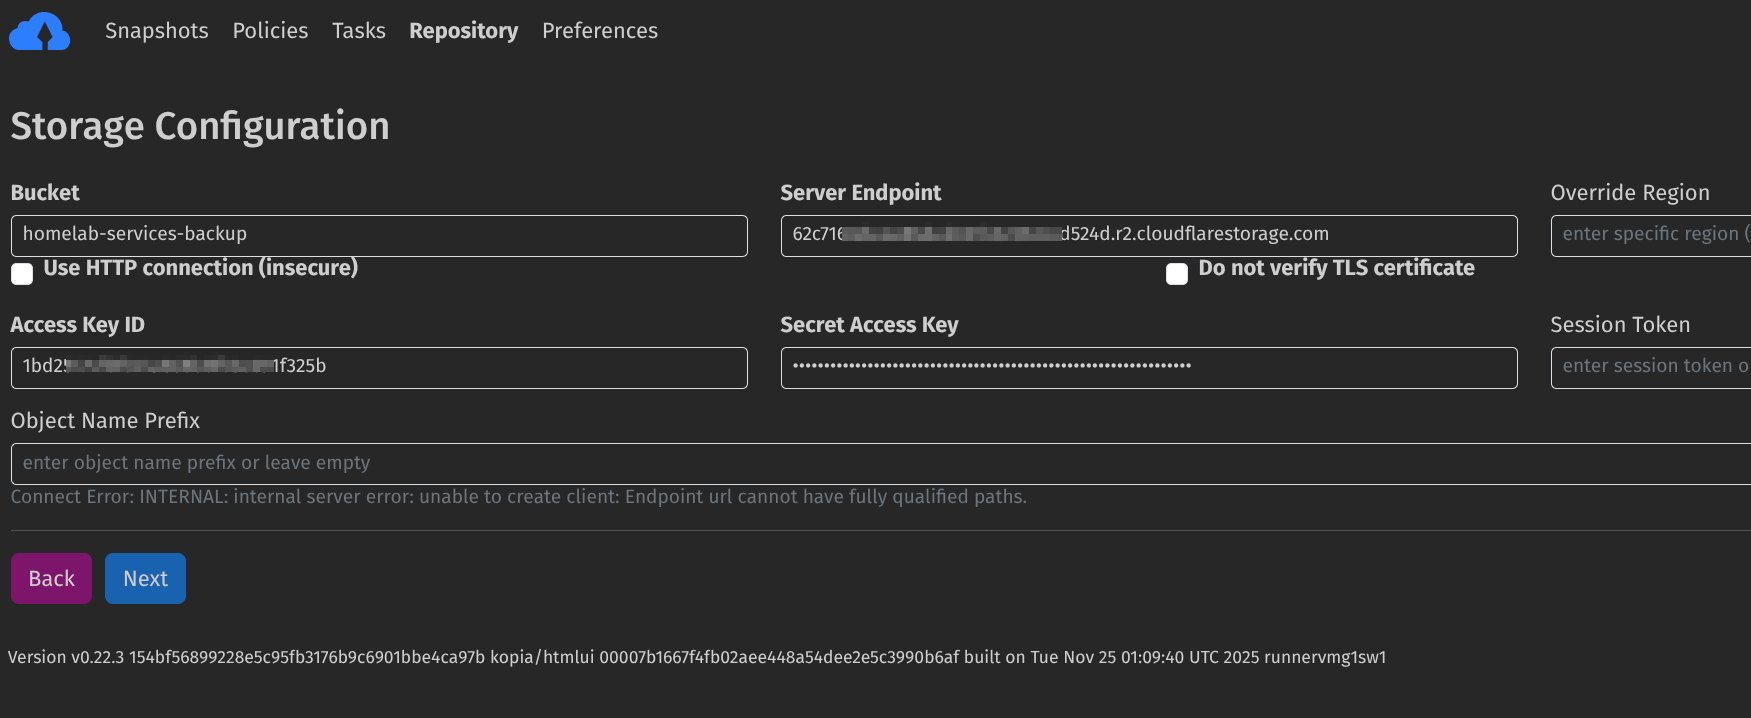
usernameand your${KOPIA_SERVER_PASSWORD}. - Click Setup Repository and select Amazon S3 Compatible.
- Enter R2 Details:
- Endpoint:
<ACCOUNT_ID>.r2.cloudflarestorage.com - Access Key ID / Secret Access Key: (From Step above)
- Bucket:
<bucket_name> - Region:
auto
- Endpoint:
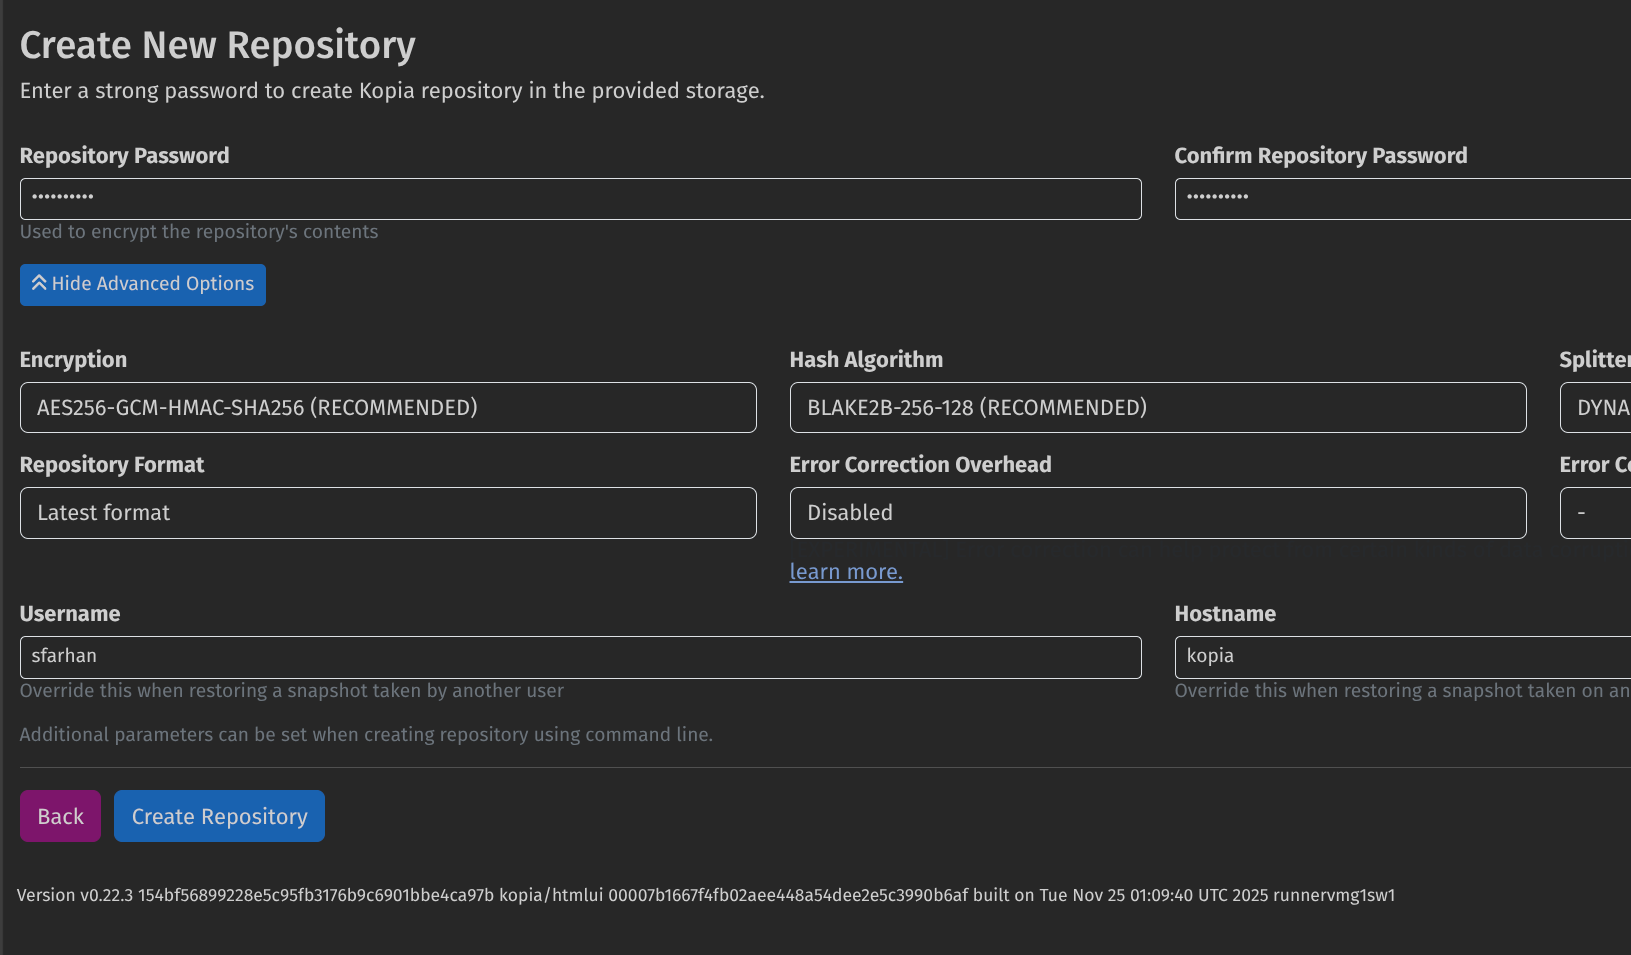
The Master Encryption Password
During the repo setup, we will be asked to set a repository password. If we lose this password, our cloud backups are permanently unrecoverable. This password must perfectly match the KOPIA_PASSWORD=${KOPIA_REPO_PASSWORD} variable in our .env file so the container can auto-mount the bucket on reboot.
Username@Hostname
I usually give a username (eg:admin) vs the default root alongside the hostname (configured in compose file)
Policy Configuration (Scheduling)
Once connected, we must define the backup schedule and retention policy for the /source/homelab/services directory. We can do this via the Web UI, or execute it instantly via the CLI:
docker exec -it kopia kopia policy set /source/homelab/services \
  --snapshot-time=04:00 \
  --keep-latest 10 \
  --keep-daily 7 \
  --keep-weekly 4 \
  --keep-monthly 12 \
  --compression=zstd-fastest
Check Repo Status
docker exec -it kopia kopia repository status
Estimate Snapshot Size
docker exec -it kopia kopia snapshot estimate /source/homelab/services
Run first snapshot
docker exec -it kopia kopia snapshot create /source/homelab/services

Disaster Recovery Drill
To verify the setup, we can try run a simulated restoration drill:
- Spin up a fresh local VM or secondary machine.
- Install Docker and Kopia.
- Connect Kopia to the Existing Repository (Cloudflare R2) using the exact same credentials and Master Password from Step 3.
- Mount a local restoration folder to the container (e.g.,
/restore-target). - Execute the restore command for the latest snapshot:
kopia snapshot restore <SNAPSHOT_ID> /restore-target - Verify: Navigate into the restored folder and run
docker compose up -dto ensure the configurations and databases work perfectly.