Authentik
Was previously using Authentik before moving over to VoidAuth.
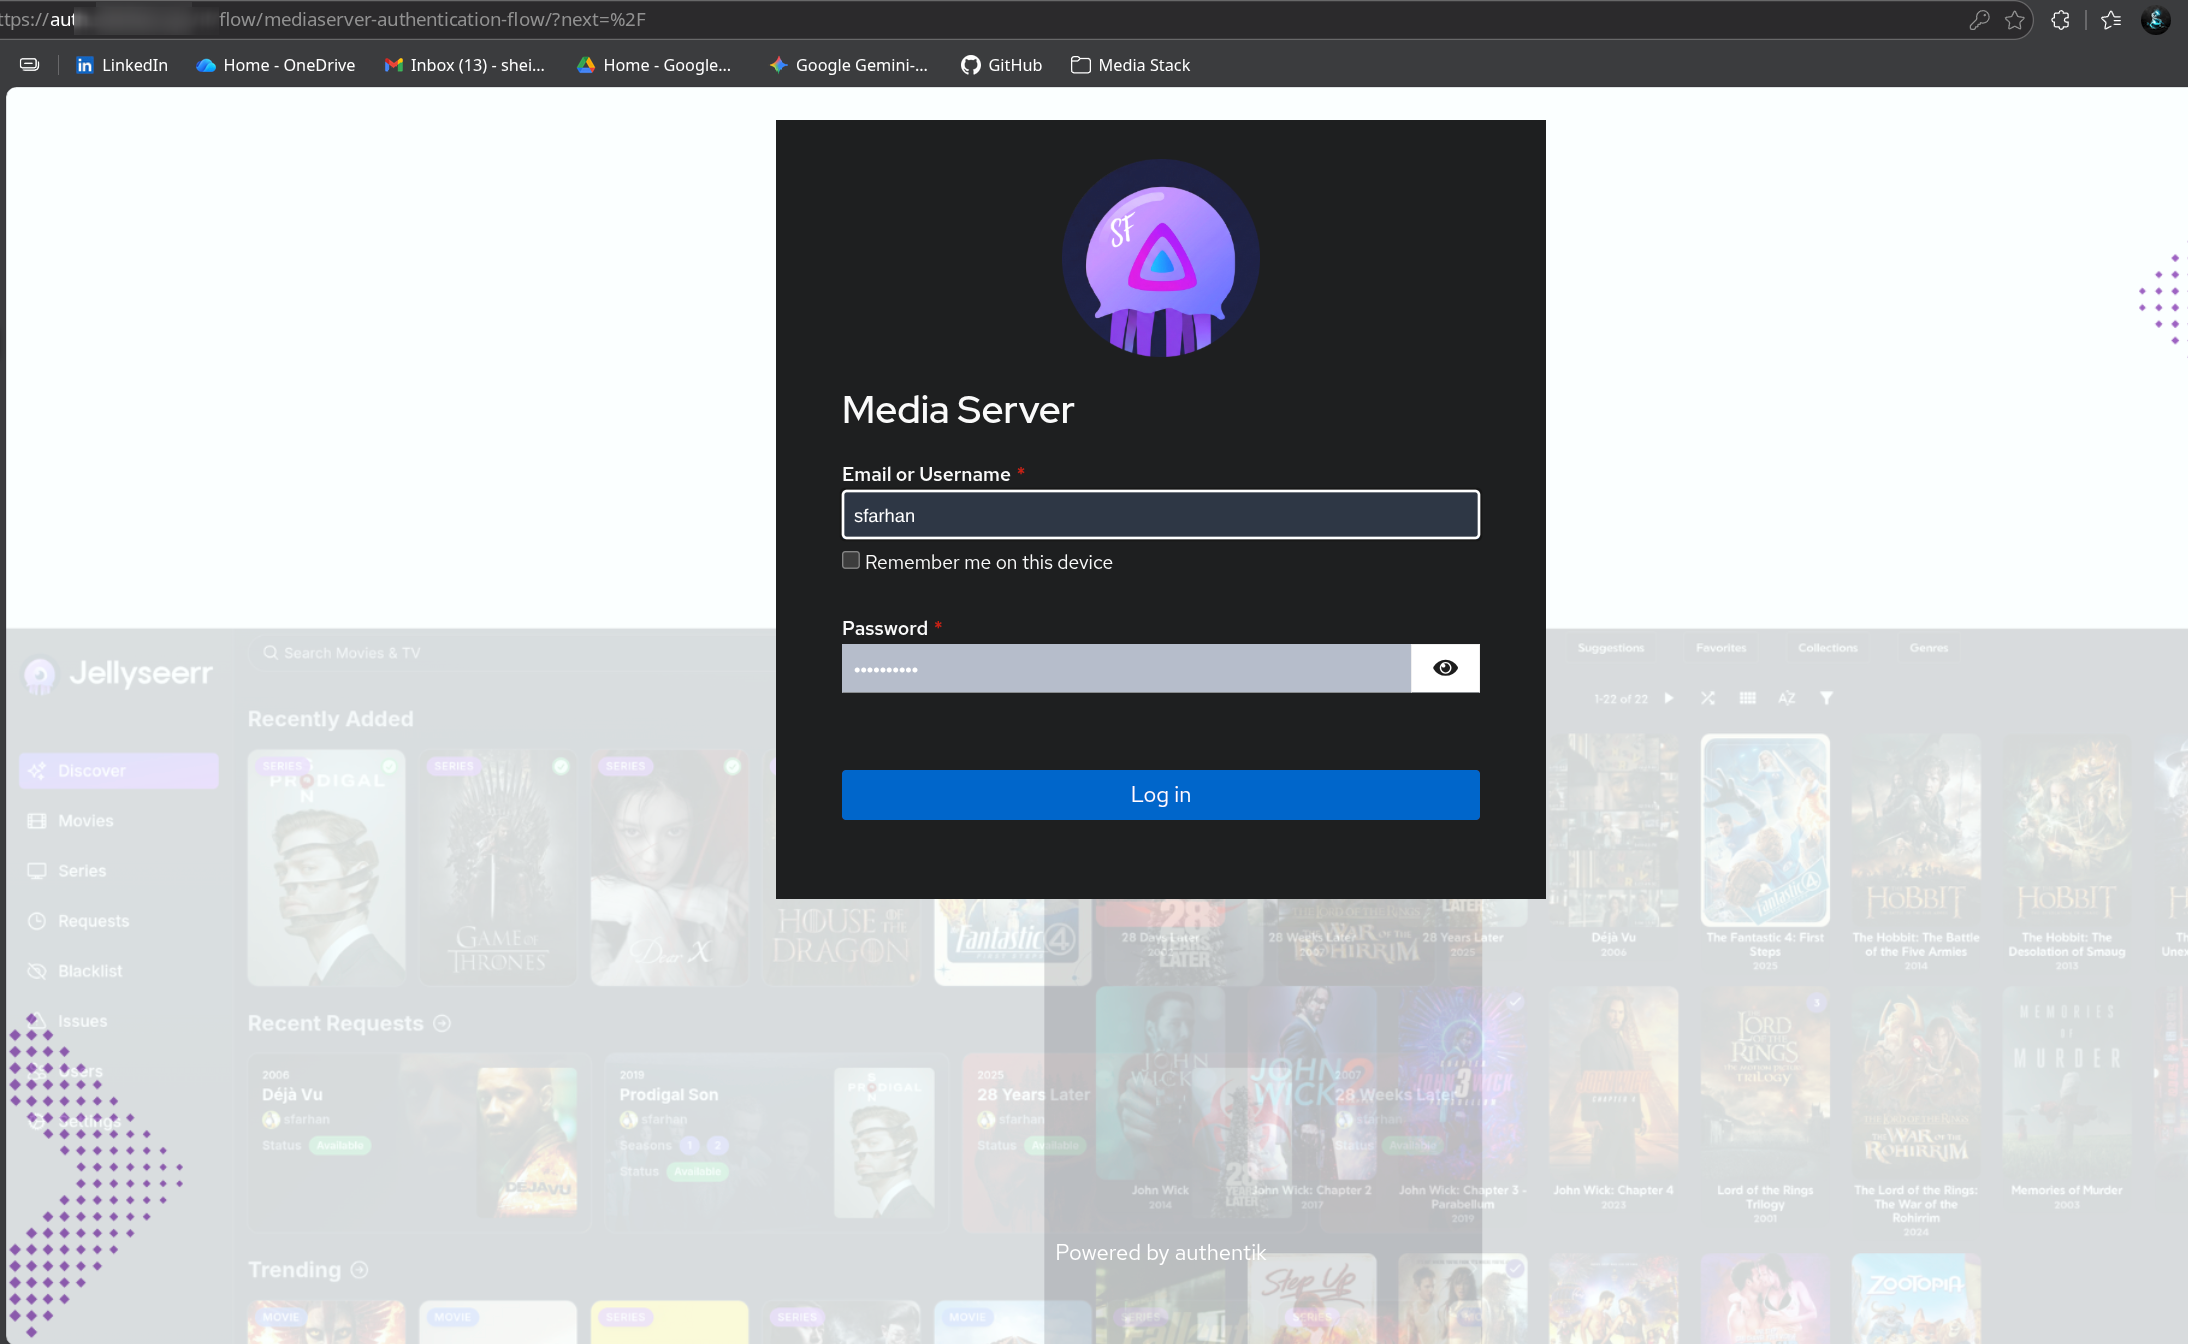
The use-case is mainly for external users to access my publicly-exposed website/domain infront of caddy's reverse proxy. I secured the requests.domain.xyz domain that will bring them to the Seerr service.
I setup the default-authentication-login stage with a 52 weeks settings for both Session Duration and Remember Device (to prevent annoyance).
Customised Landing Page:
Docker Compose
Official Documentation: https://docs.goauthentik.io/install-config/install/docker-compose/
# ----------------------------------------------------------------------------------
# AUTHENTIK - IDENTITY PROVIDER (SSO)
# ----------------------------------------------------------------------------------
networks:
dockerapps-net:
    external: true

services:

# 1. Database (PostgreSQL)
authentik-db:
    image: docker.io/library/postgres:16-alpine
    container_name: authentik-db
    networks:
    dockerapps-net:
        ipv4_address: 172.20.0.34
        ipv6_address: 2001:db8:abc2::34
    healthcheck:
    test: ["CMD-SHELL", "pg_isready -d $${POSTGRES_DB} -U $${POSTGRES_USER}"]
    start_period: 20s
    interval: 30s
    retries: 5
    timeout: 5s
    labels:
    # Tell WUD to ONLY notify if there is a newer '16-alpine' tag (security patches)
    - "wud.tag.include=^16-alpine$$"
    volumes:
    - ./database:/var/lib/postgresql/data
    environment:
    - POSTGRES_PASSWORD=${AUTHENTIK_PG_PASS}
    - POSTGRES_USER=${AUTHENTIK_PG_USER}
    - POSTGRES_DB=authentik
    restart: unless-stopped

# 2. Authentik Server (The Brain)
authentik-server:
    # Using '2025.10' pulls 2025.10.1, .2, .3 automatically on re-pull
    image: ghcr.io/goauthentik/server:2025.10
    container_name: authentik-server
    hostname: authentik
    networks:
    dockerapps-net:
        ipv4_address: 172.20.0.35
        ipv6_address: 2001:db8:abc2::35
    command: server
    environment:
    - AUTHENTIK_POSTGRESQL__HOST=authentik-db
    - AUTHENTIK_POSTGRESQL__USER=${AUTHENTIK_PG_USER}
    - AUTHENTIK_POSTGRESQL__NAME=authentik
    - AUTHENTIK_POSTGRESQL__PASSWORD=${AUTHENTIK_PG_PASS}
    - AUTHENTIK_SECRET_KEY=${AUTHENTIK_SECRET_KEY}
    # SOCKET PROXY CONNECTION
    - DOCKER_HOST=tcp://socket-proxy:2375
    labels:
    # Tell WUD to ignore anything with 'rc' or 'beta' in the name
    - "wud.tag.exclude=^.*(rc|beta|alpha).*$"
    volumes:
    - ./media:/media
    - ./templates:/templates
    ports:
    - 9000:9000
    - 8443:9443
    restart: unless-stopped
    depends_on:
    authentik-db:
        condition: service_healthy

# 3. Authentik Worker (Background Tasks)
authentik-worker:
    # UPDATED: Must match Server version exactly
    image: ghcr.io/goauthentik/server:2025.10
    container_name: authentik-worker
    networks:
    dockerapps-net:
        ipv4_address: 172.20.0.36
        ipv6_address: 2001:db8:abc2::36
    command: worker
    environment:
    - AUTHENTIK_POSTGRESQL__HOST=authentik-db
    - AUTHENTIK_POSTGRESQL__USER=${AUTHENTIK_PG_USER}
    - AUTHENTIK_POSTGRESQL__NAME=authentik
    - AUTHENTIK_POSTGRESQL__PASSWORD=${AUTHENTIK_PG_PASS}
    - AUTHENTIK_SECRET_KEY=${AUTHENTIK_SECRET_KEY}
    # SOCKET PROXY CONNECTION
    - DOCKER_HOST=tcp://socket-proxy:2375
    user: root
    labels:
    # Tell WUD to ignore anything with 'rc' or 'beta' in the name
    - "wud.tag.exclude=^.*(rc|beta|alpha).*$"
    volumes:
    - ./media:/media
    - ./certs:/certs
    - ./templates:/templates
    restart: unless-stopped
    depends_on:
    authentik-db:
        condition: service_healthy
Secrets in .env
To generate secure, random values for our db password and Authentik secret key, we can use openssl for this purpose.
echo "AUTHENTIK_PG_PASS=$(openssl rand -base64 36 | tr -d '\n')" >> .env
echo "AUTHENTIK_SECRET_KEY=$(openssl rand -base64 60 | tr -d '\n')" >> .env
${AUTHENTIK_PG_USER} can be any user name of choice.
Compose File Composition
The service is composed of three main containers: the Database (PostgreSQL), the Server (Management/API), and the Worker (Background Tasks).
Setting Up Guide
Create New Brand
- System -> Brands
- Click New Brand and enter the created domain for external users to access
- Brand Settings: Choose the relevant images that we will upload to the local media folder.
- Under
Default Flow, revisit this part later to select newly createdcustom-authentication-flow.

Applications Setup
I primarily use Authentik's "Proxy Provider" mode.
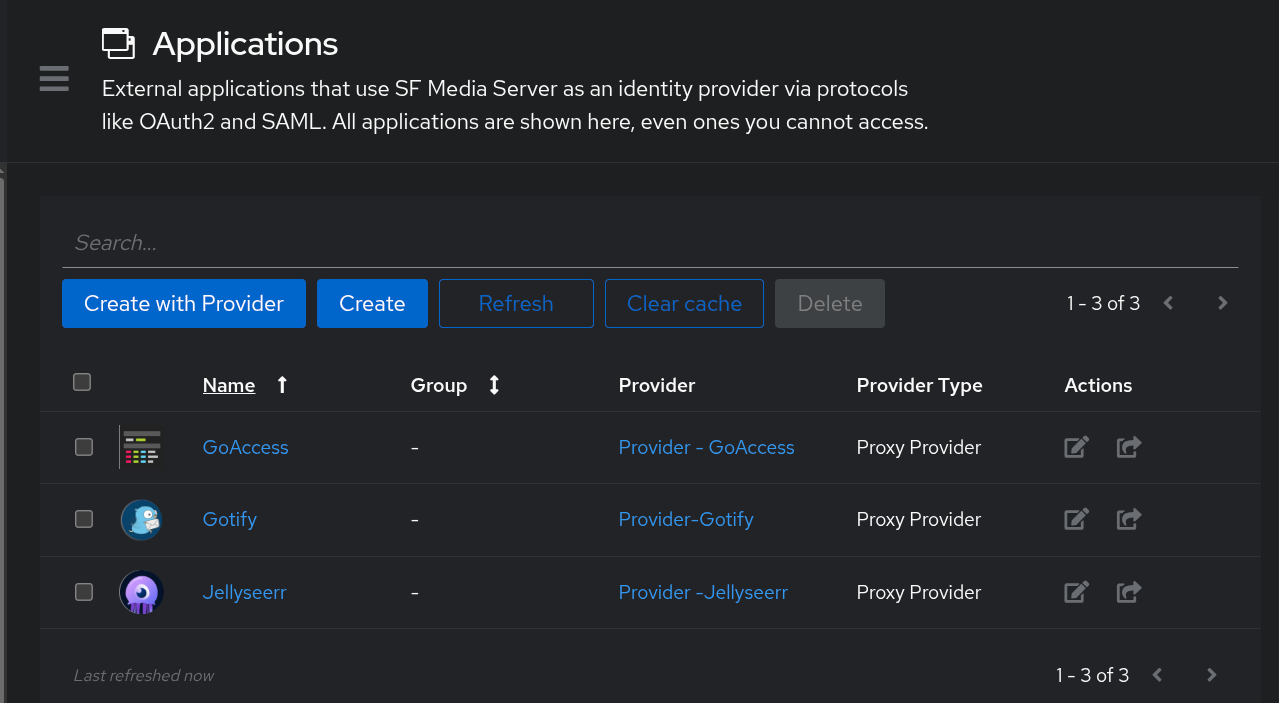
Creating a Provider and then an Application
Step 1: Create Provider
- Applications -> Providers
- Click Create and select Proxy Provider
- Configuration:
- Name:
Provider - <AppName>(e.g.,Provider - Gotify) - Authorization flow:
default-provider-authorization-implicit-consent(Skips the "Approve this app" screen) - Authentication mode:
Forward auth (single application) - External Host: The public URL (e.g.,
https://gotify.domain.xyz)
- Name:
Step 2: Create Application
- Navigate to Applications -> Applications
- Click Create
- Configuration:
- Name
<AppName>(e.g.,Gotify) - Slug:
<app-slug>(Auto-generated) - Provider: Select the provider created in Step 1
- Name
Add Applications to Outpost
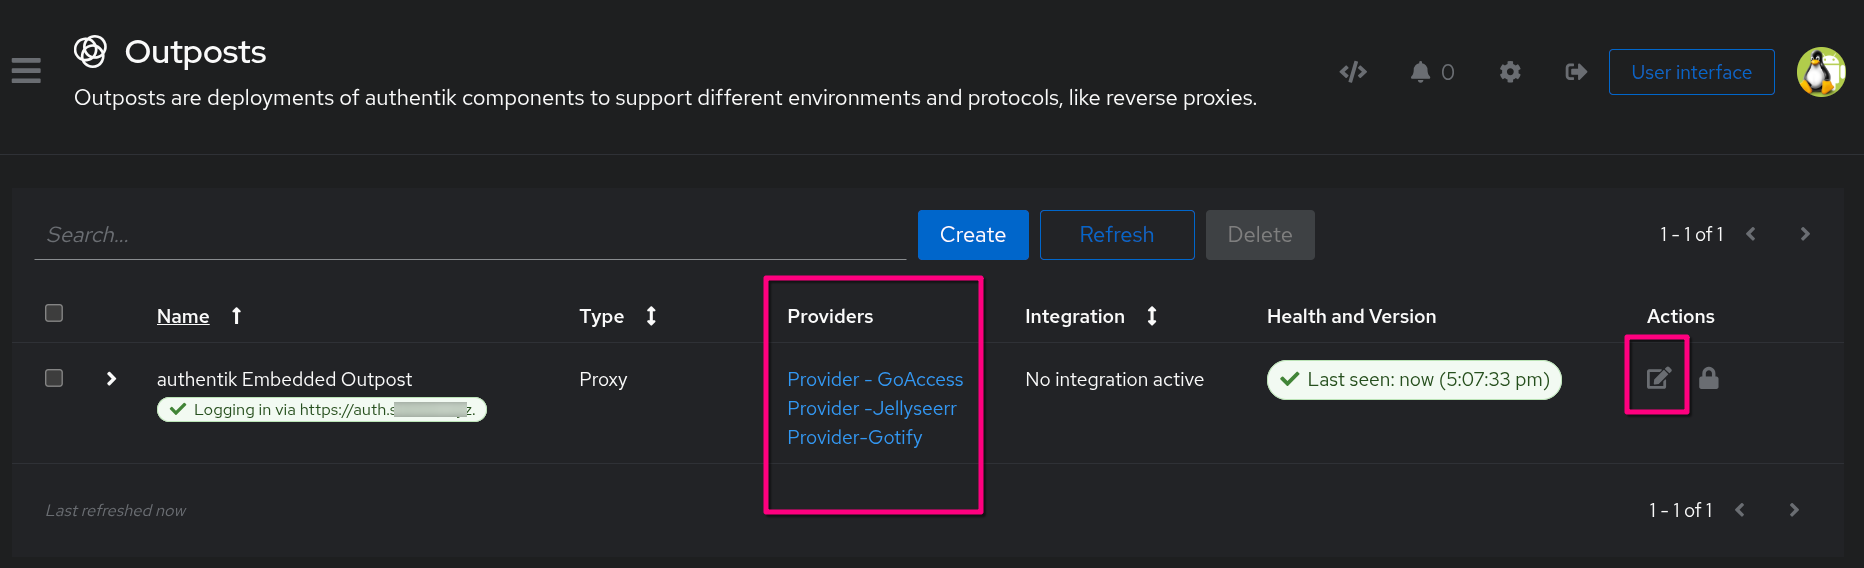
While "Providers" define how to authenticate, the Outpost is the actual component that performs the authentication. We use the Embedded Outpost (built into the main server) rather than deploying separate proxy containers.
Critical Step - Link Application to Outpost
After creating an application, we must explicitly link it to the Outpost, or the authentication service will not run for that app.
Step 1: Link Applications
- Navigate to Applications -> Outposts
- Locate the
authentik Embedded Outpost - Click the Edit (pencil) icon
- Under Applications, select the applications we want this outpost to manage (e.g.,
GoAccess,Seerr). Use the arrow button to move them to the "Selected Applications" list - Click Update
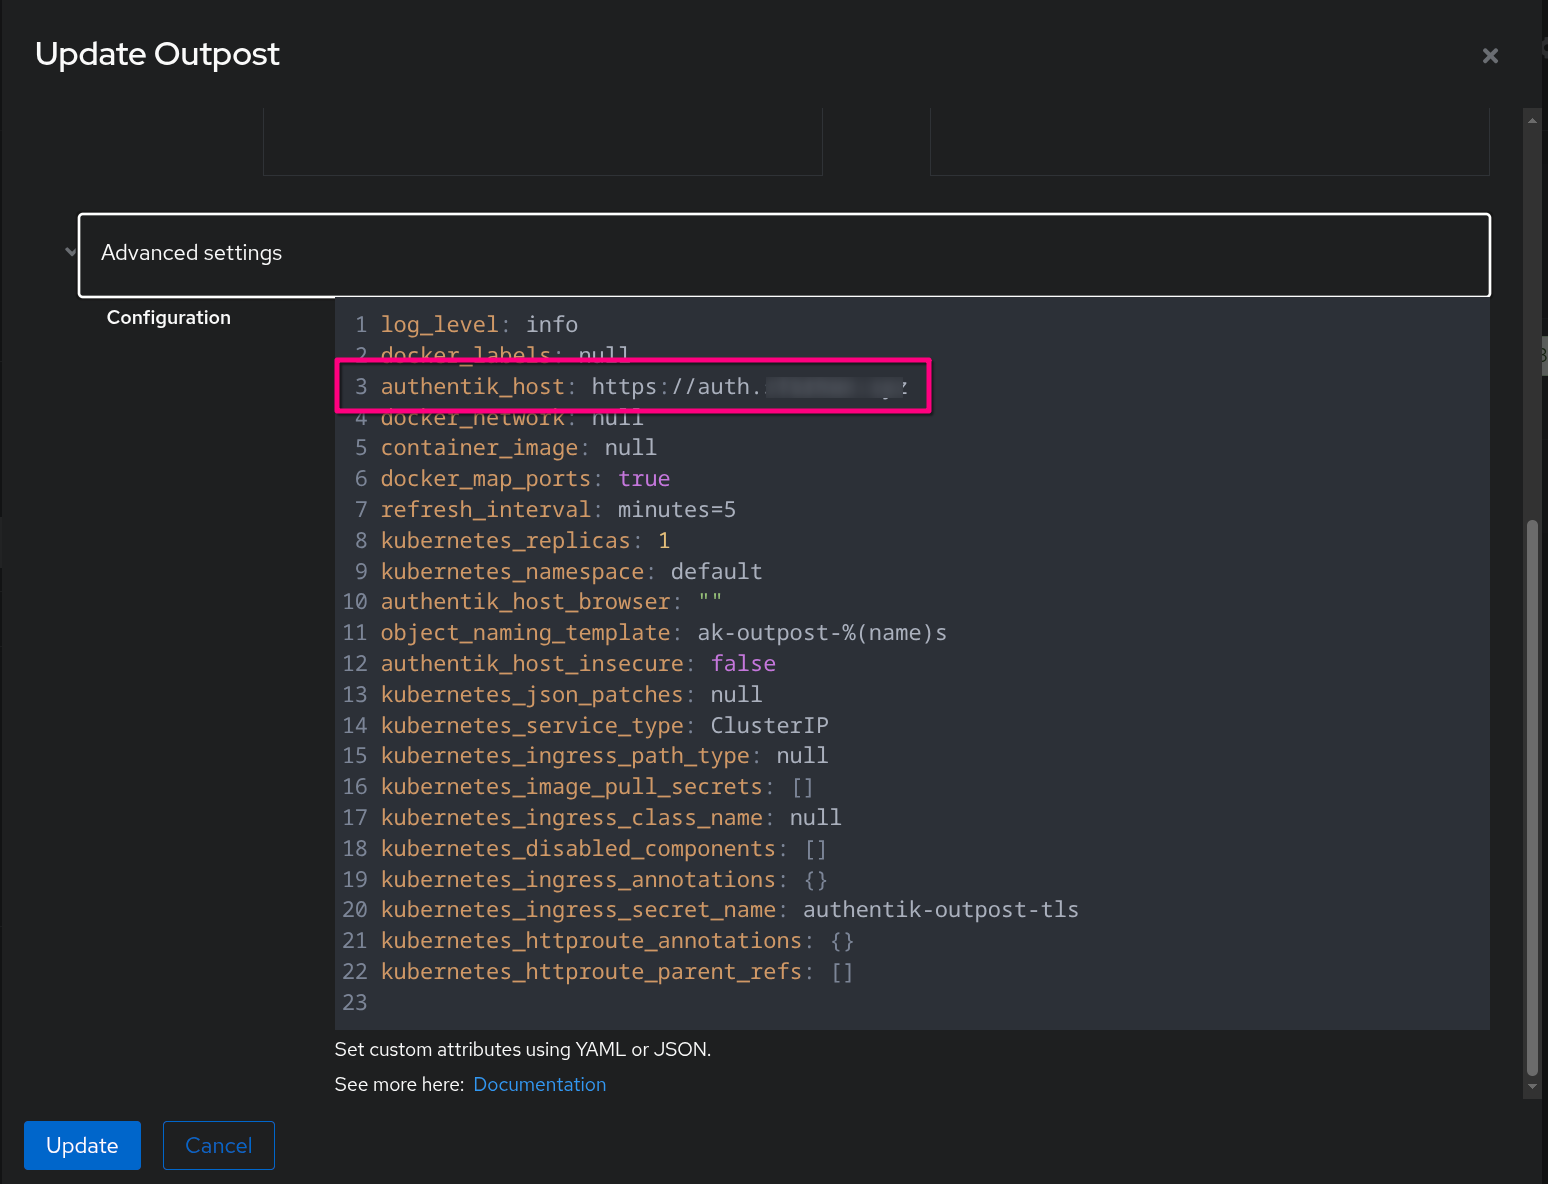
Step 2: Advanced Configuration (Reverse Proxy Fix)
To ensure the Outpost generates valid redirect URLs (instead of internal Docker IPs), we force the host URL in the advanced settings.
- In the Edit Outpost screen, expand Advanced Settings
- Locate the
authentik_hostkey. - Set it to our public URL:
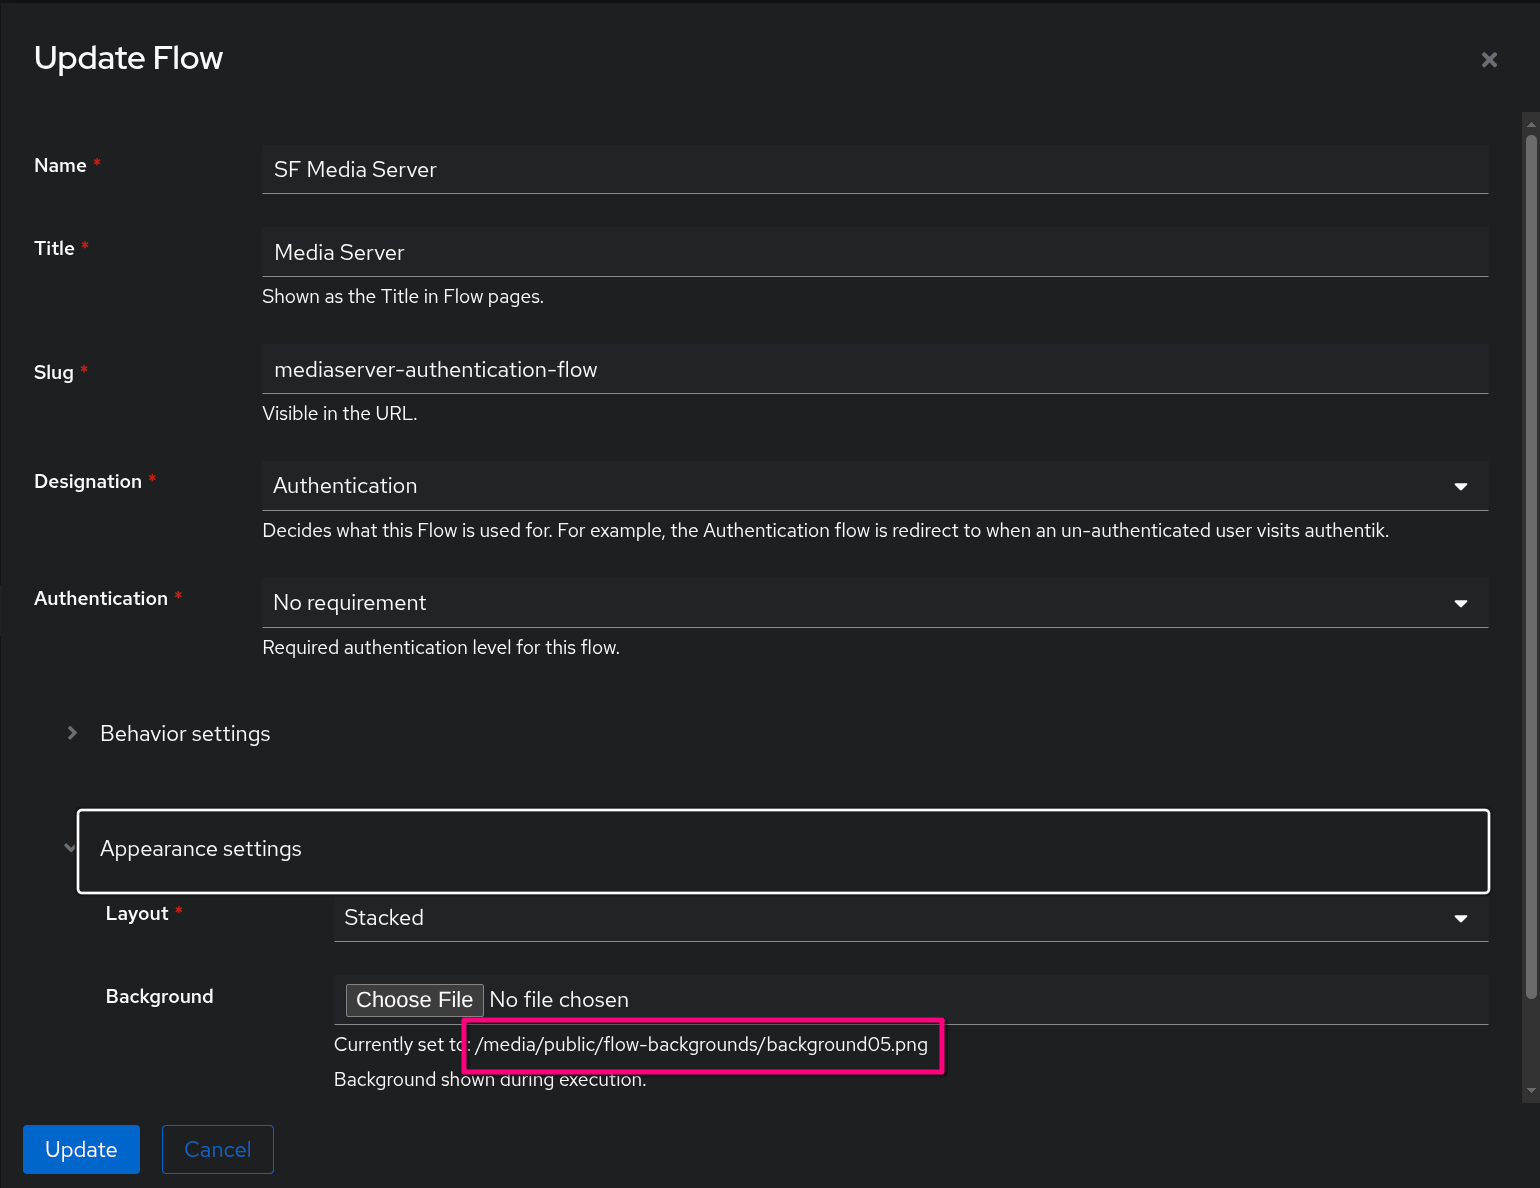
Authentication Flow and Stages
We use a custom authentication flow for users accessing the Media Request portal (Seerr).
- Navigate to Flows and Stages -> Flows
- Click default-source-authentication
- Configuration:
- Name:
<ServerName or Server "Purpose">(e.g.,Family & Friends Media Server) - Title:
<This instance "Title">(eg: FamilyFlix) - Slug:
<mediaserver-authentication-flow>- it will be saved/updated as a new entry in the list of authentication-flow that we can use - Behavior & Appearance Settings:
- Compatibility mode:
Enabled(Increases compatibility with password managers). - Background: Upload a background in local dockerapps/authentik/media folder and use it for the Background setting
- Compatibility mode:
- Name:
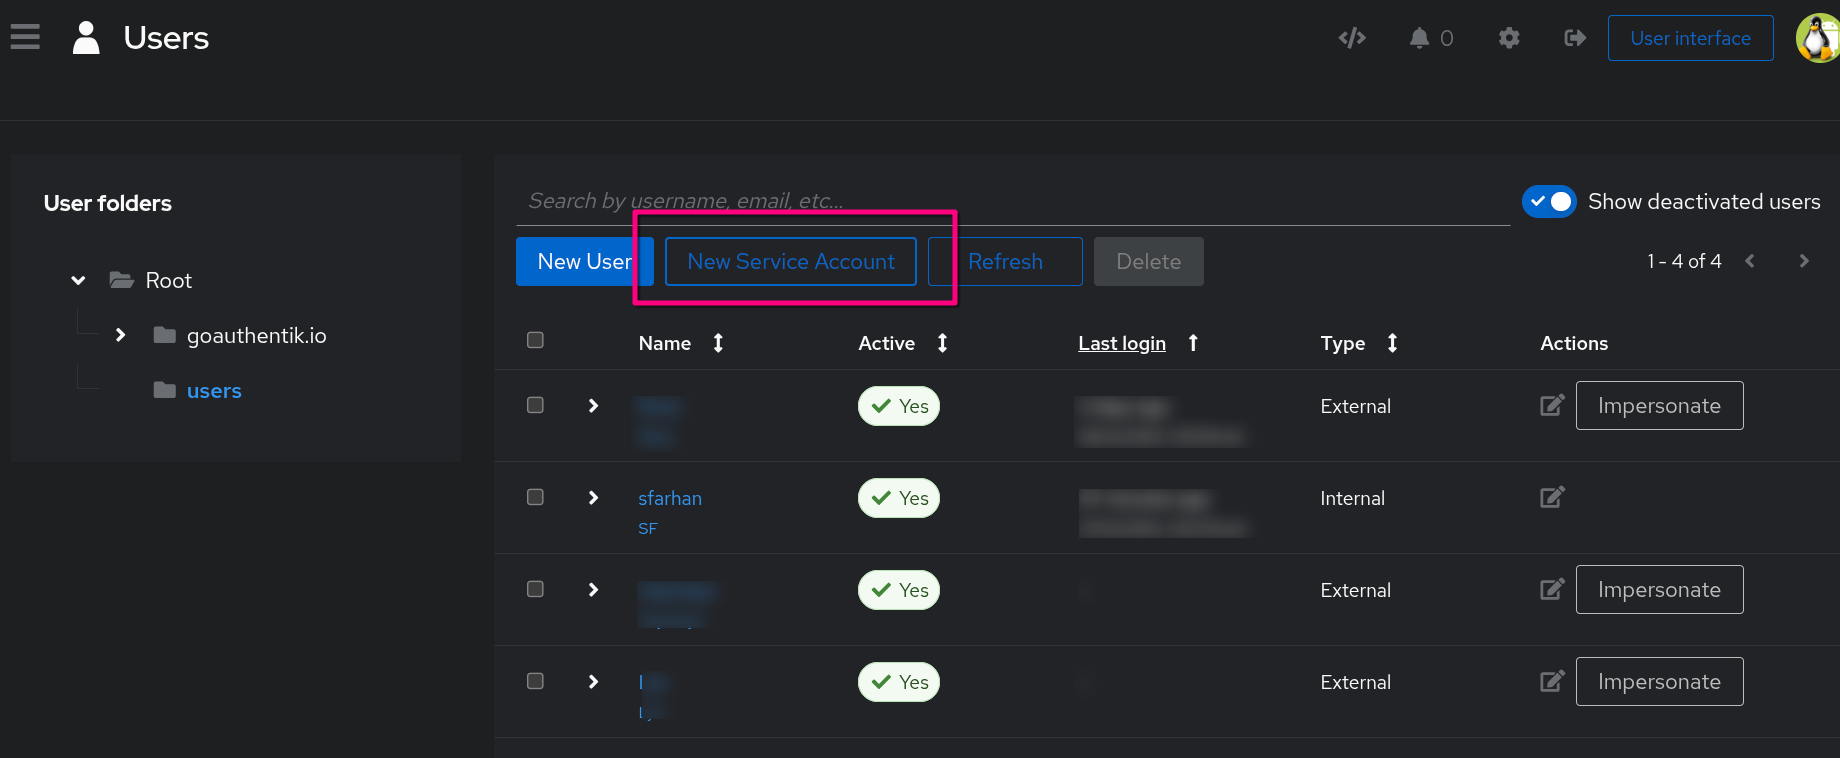
User Management (External Users)
Create specific users for external access (e.g., family accessing Jellyseerr).
- Navigate to Directory -> Users
- Click Create .
- Configuration:
- Username:
<username> - Name:
<Full Name> - Email:
<[email protected]> - Note: For Password, I am not bothering with the Invitation/Inbound Flow,so I created for my family and friends the password (same password that I gave them for Jellyseerr). Do this after the user is created and click on the user to enter the password for them.
- Username:
- Attributes (The "External" Tag):
Note:_ Configure this user as External to limit their access to specific applications only.
Homepage Integration (API Token)
To allow the Homepage dashboard to display Authentik stats (or just to show the service status using a dedicated account), we use a service account and a permanent token.

Over at Homepage's services.yaml file, I added the following:
    - Authentik:
    icon: authentik.png
    href: https://auth.{{HOMEPAGE_VAR_ROOT_DOMAIN}}
    description: Authentication
    container: authentik-server
    widget:
        type: authentik
        url: http://authentik-server:9000
        key: {{HOMEPAGE_VAR_AUTHENTIK_API_TOKEN}}
        version: 2
Setting up the Authentik API Token:
Step 1: Create Service Account
- Go to Directory -> Users
- Create a new Service Account user with username
homepage-service - (Optional) Disable login for this user if it's API-only
Step 2: Generate Token
- Go to Directory -> Tokens & App Passwords
- Click Create
- Configuration:
- Identifier:
service-account-homepage-service-password - User:
homepage-service - Intent:
API Token(Used to access the API programmatically) - Expiring: Turn OFF (to prevent broken widgets in the future).
- Identifier:
- Copy the Token: You will need this for the
homepage/services.yamlconfiguration.
